31.07.2013

TUTORIAL reinforced concrete / Stahlbeton


Hey Guys,

today I want to show you a little tutorial about the making of reinforced concrete. I use this method to make a little base. I know that real streets are not build in that way, but I like the finished result :). The next time I will build a little Cityfight scene for a small project then I will use the same technique for two walls.

What do you need for?

- brass wire (the bigger the wall the longer the brass wire)
- ceramic powder or some gypsum (I prever ceramic powder its stronger and harder than gypsum)
- a blister part or something flat with a little border
- a soldering iron
- a hammer and a calliper
- wooden glue
- fun and mood :D


1. First Step

Take your brass wire ( I used around one meter) and pull it through an fixed objekt (I used a lamp holder). After this you have to put the ends into a little drilling machine (drill with your hands you need too long, buuuut you can try it :))

Drill as long as you mean the right form is ready. The more you drill the tighter the spiral and harder your final spiral.


After that cut it off from your fixiation and cut it into your wished sizes. Beware don't fold or bend your sprial otherwise you will get no straight "steel"bars


2. Second Step

Prepear your spirals in that form you want to have at the end. Than start with the soldering. Do start with the outer spirals and work to the middle. It's a little bit tricky don't hold the soldering iron too long on your spirals otherwise you will lose soldered parts at neighbour places again.

DO NOT USE GLUE FOR THE FIXATION ITS NOT STRONG ENOUGH FOR THE FIFTH STEP ;)


3. Third Step

The steel bars should be in the middle of the wall. For a little distance I bend the ends 90° and cut all to the same lenght. The longer these ends are the bigger your distance to the wall surface will be.


4. Fourth Step

Put your spiralconstruct into your blisterform. The bigger the form the more you need from gypsum or ceramic powder. You should look to find a form not much bigger than your spiralonstruct.

Than mix your powder like in the powder instruction and fill it up. And now let it dry!


5. Fifth Step (brute force MUAHAHA)

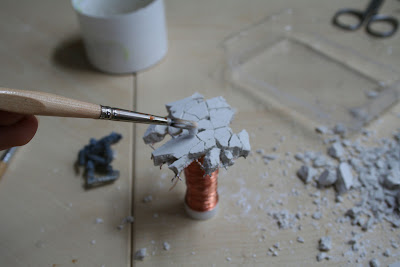
Take the block out of the form and now hit it with a hammer. Show the block where the frogs have their hair curls ^^. You can use a calliper too to work on your damaged object.
You have to decide how damaged the final result would be. I want a heavily damaged street. I think a wall should be damaged only on the outer sides. But its your choise how much ceramic you hit or cut.


6. Sixth Step

Take some wooden glue and water 3/1 and fill up the whole construct with this mixture. So you get a realy strong finish.


FINISH

At the end I put my result on a base and put some small bricks from hammering with some glue on the base :)


This is the finish result with the Mini on top :D


I hope you enjoy the small Wednesday tutorial and maybe you can use it for one of your next project :D


Cheers Manu

28.07.2013

Painting despite hot weather :)!


Hey Guys,

the time is short and in the last few months I wrote too less here on blog. Sorry for that! I have decided that my posts will be only in english in the future. The main reason is simply my time. As Thousand project man I have too many things I want to do. Work, girlfriend (in one year wife :D), onlineshop, painting miniatures, activities with friends and so on. Many of you know this problem ;)

So this is why you will only read the next posts in english :) I hope it's ok for you all!.

At the moment I work on two projects which must be ready in two weeks. The first is Lietpold from Forgeworld and the second one is a Praetorian Marine from Forgeworld. I really like the Miniatures!


More pictures soon ;)


Cheers Manu

26.07.2013

Cang beim Fotografen

Wie einige von euch vielleicht mitbekommen haben, habe ich von Dezember ´12 - Mai ´13 ein Diorama mit Cang the Implacable als Hauptprotagonisten gebaut.

Gestern nun war es endlich soweit und das gute Stück wurde ordentlich in Bilder gebannt. Behilflich war mir dabei Michael Fischer von Micha Fischer Photography. Das ganze fand in seinem Hauseigenen Fotostudio statt.

Hier ein paar Bilder des "Shootings".


Hier mal ein kleiner Teaser auf das Ergebnis.

Mehr von Cang und auch ein ausführliches Bautagebuch demnächst hier bei uns.

Stay tuned.....

20.07.2013

Jakobs Werkbank Elfen Battle Engine und Schwertschwinger FERTIG

Die Zeit vergeht wie im Flug, wenn man was zu tun hat...
Stimmt.
Es gab viele Dinge die mich von diesem letzten Auftrag abgehalten haben. Motivation, Hitze, geringe Freizeit (jaja ich war zu oft auf dem See beim segeln..), Steam Summer Sale undundund...
Aber egal jetzt hab ich die auch fertig und wenn sie das OK vom Auftraggeben bekommen, treten sie ihre Reise gen Norden an.

Als erstes kommt der Käfer drann.mit der Airbrush gings ihm erstmal an die Farblosigkeit und dann hieß es Elektrolinien zaubern. Im "Gesicht" wollte ich nen Glühwürmcheneffekt erreichen. Ka obs geklappt hat ;)


Die drei Hansele versuchen mit erhobenen Armen dem Käfer klar zu machen wohin er laufen darf und weil es Elfen sind klappt das auch noch!


Gut ein Drittel hätte ich mir bei dieser Generatorscheibe sparen können, da man sie nach dem Zusammenbauen nicht sieht, aber so was merkt man ja auch erst immer zum Schluß.


Und nein ihr habt kein Deja-Vu. Dieser Trupp unterscheidet sich RIESIG vom Letzten Trupp. (War natürlich auch ein großer Motivationsblocker)


Damit ihr auch mal einen Meister im "dukommstnichtvorbei" seht konnte ich ein seltenes Lichtbild von meinem Kater schießen.


UNTER DIESEN KATASROPHALEN BEDINGUNGEN MUSS ICH HIER ARBEITEN!!!!11drölf!

Ist natürlich auch nicht motivationsfördend.

Was hingegen EXTREM motivationsfördernd und energiezurückgebend war, war das Malkränzchen XL mit meinen Vincibrüdern! Hier zum Abschluss noch ein paar Impressionen:

Die Truppe hatte ich mir extra noch am Event zusammengeschustert...
Um dann einfach "nur" meine Warjakcs fertig zu Pinseln... von denen ich immerhin 4 fertig bekommen habe.


Der kleine Tim möchte gerne im Trommlerparadies abgeholt werden.


 Keine Ahnung ob der da fertig wird, aber es war auf jeden Fall eine geile Idee.


Und für alle die nicht mehr wissen wie es damals war, als sich alle diesen "tollen" Sommer gewünscht haben:


Was ich heute gelernt habe: Wärend dem Schmelzen und großartigen Ablenkungen doch noch zu arbeiten.

Was ich heute nicht gelernt habe: Genug zu trinken. ICH HAB DURSCHT!

16.07.2013

Midsummer WIP's


Hallo Freunde!

Endlich hat der Sommer auch den Bodensee erreicht, denn es ist nunmehr seit fast 2 Wochen am Stück schön. Das bedeutet aber auch gleichzeitig das sich Miniaturenmässig nicht so viel Neues getan hat.

Hello Friends!

Finally summer hit the lake of constance and there is not so much new stuff to see miniatures wise. 

I'll just summon up what is on my desk at the moment, cause I want to go out an jump in the cool water to get relaxing time after work.

Kein Artikel ohne Neuigkeiten vom Warlord Titan:

Es ist schon wieder viel zu lange her das ich Fotos von Orcanus meinem Warlord gezeigt habe. Klar, das der Fortschritt den man darauf sehen könnte ist nicht so gewaltig wie er selbst, denn es geht ja primär um die vielen Details. Ich habe ausserdem die Schienbeinpanzer gebastelt und hatte einen "Oh Mann, alle coolen Hydraulik Teile sieht man nun nicht mehr...wtf!-Moment". Aber dafür gibt es nun noch viel mehr Fläche die nach Nieten und einer klasse Bemalung schreit :)

No post without news from the Warlord Titan:

It's been much to long, since I posted some pictures from Orcanus the Warlord. The progress I made on him is not so big, cause I'm deep into detailing all the different parts. I started to build the shin guards and had a moment of "oh man, they will hide all the cool hydraulic piping...wtf!" But in the end there is lot's of new space to be detailed and painted :)


Nächstes Mal dann wieder ein vollständiger Artikel zum Warlord Titan. 
Next time there will be a whole new episode of Warlord wip.
_

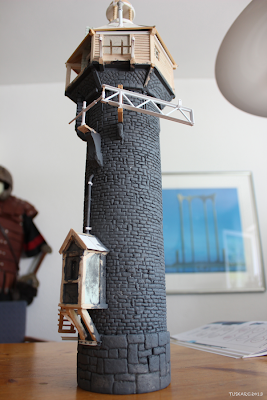
Wie Ihr vielleicht schon auf den Bildern vom Malkränzchen XL gesehen habt, bin ich bei meinem Geländeprojekt für Warmachine ein wenig mit dem Leuchtturm weiter gekommen. Da möchte ich Euch heut ein paar Nahaufnahmen davon zeigen.

As you might have seen, the Lighthouse, the second terrain piece for my WARMACHINE gaming table, was on some photo at the "Malkränzchen XL". So I'll show you some close ups today. Still lots to do till I can take the brush and paint it, but you can see where I'm heading.


Wie ihr sehen könnt habe ich den Steinsockel und den gemauerten Ziegelbereich schon mal vorgrundiert. So wie es momentan ausschaut wird es aber sicherlich nicht bleiben. Ich bin mir ziemlich sicher das ich die Ziegel auf alle Fälle rot machen werde, wie ich das beim "Ol' Rowdy´s Inn" auch getan habe.

Schon länger fehlt das restliche Stück der Teppe zum Eingangserker. Die Regen- und Abwasserrohre  haben Halterungen und auch noch Nieten bekommen.

I've already painted the stone foundation and the brickwork, but it won't stay in this gray color, as I decided to go for the same red bricks like those of the "Ol' Rowdy´s Inn".

The stairs were missing a long time so I finally builded them out of balsa wood. And I also attached fittings for the piping. 


Vielleicht denkt Ihr Euch nun, oh nein dann wird der Turm ja viel zu rot - doch hatte ich da schon eine Idee, denn es gibt diesen armen Kerl, der Streifen auf den Leuchtturm malen wird. Vielen herzlichen Dank für's umbasteln an Thomas, den ich dieses Jahr auf dem "Herzog von Bayern" kennen lernen durfte.

You might think: Oh no, the Tower is going to bee much to red - but there will be a poor guy painting stripes on the lighthouse. A new friend I made at the "Herzog von Bayern" contest, converted this little fella for me. Many cordially thanks Thomas!


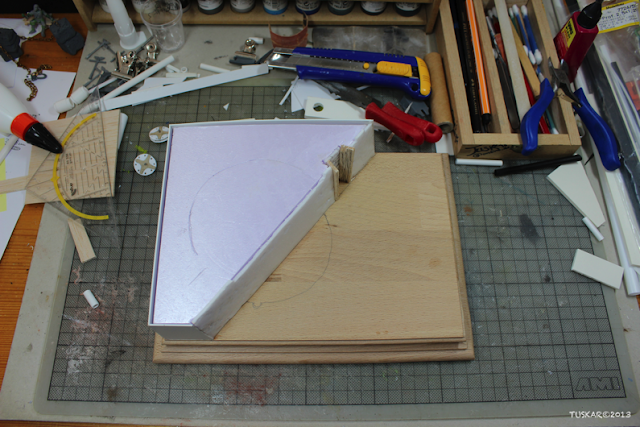
Da ich den Leuchtturm auch auf einen Wettbewerb mitnehmen will, brauche ich auch eine Dioramabase dafür:

There are plans to take the lighthouse to contests, so I had to build a diorama base for it:


Verbastelte Grüße, 
Cheers,

Euer Tuskar